
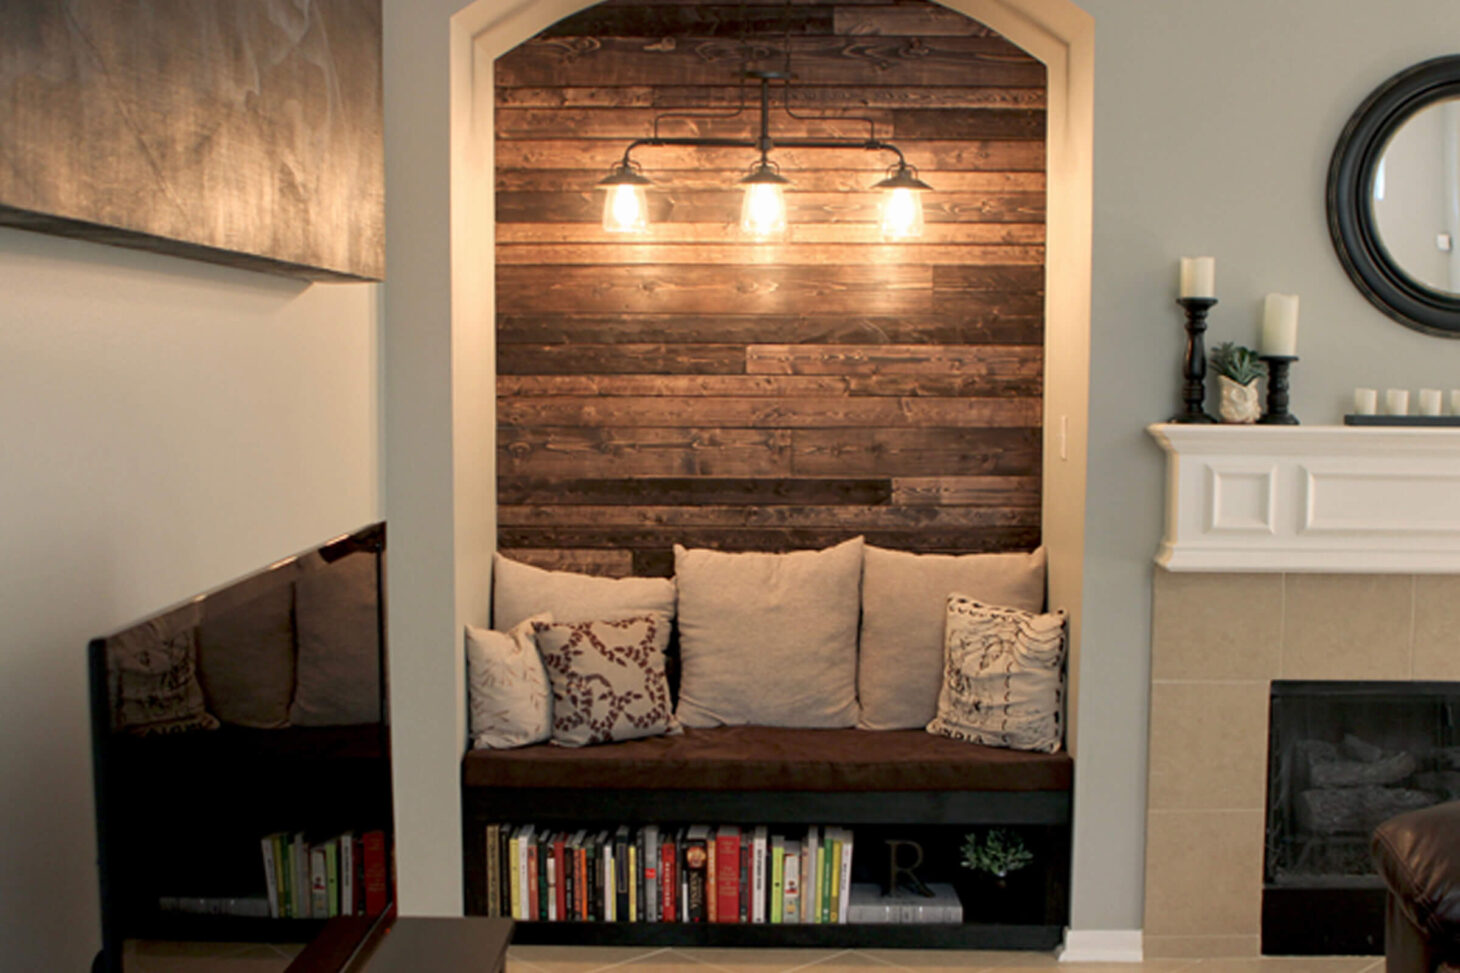
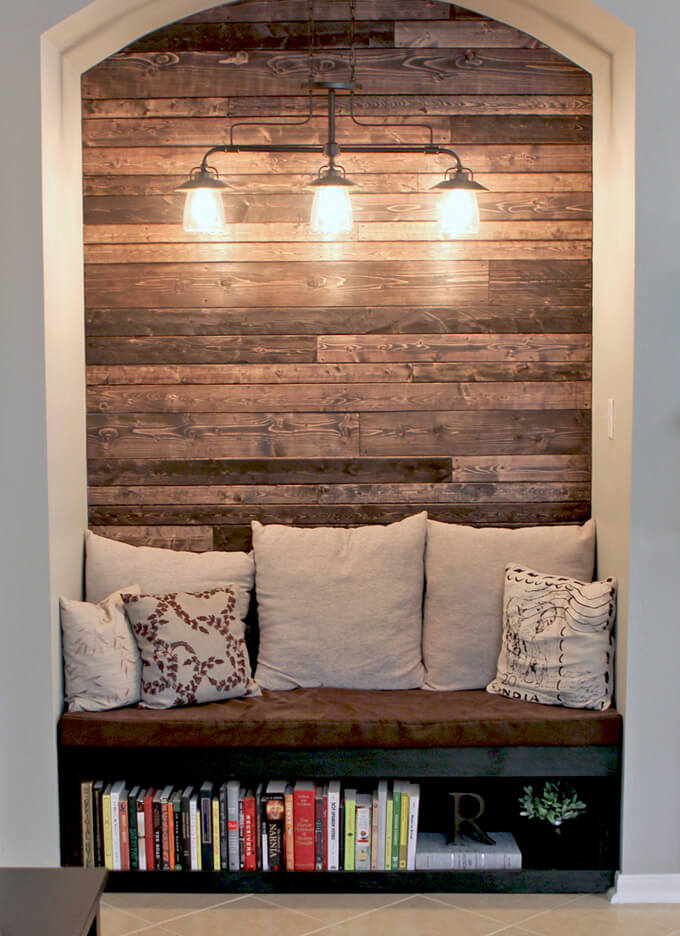
We made over an empty nook in our living room into a reading nook with a wood plank wall.
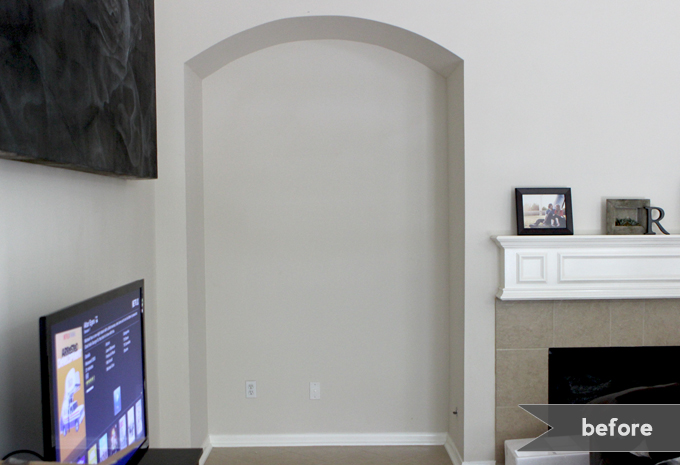
When we moved into our house there was one thing about our living room that bugged me (besides the tile). It was the inset in the wall next to the fireplace. Our guess is the home builder intended the TV to go into this space because there is an outlet for the cable and a plug on the wall but for some reason I was just not feeling it.
I knew how I wanted the room to “flow” and I found it really awkward to have the TV off center and next to the fireplace. So we set up the living room how I wanted it with the TV on the long wall and left that space empty.
When Christmas came it became the perfect spot to put our Christmas tree but we were perplexed with what to do with the space the other eleven months of the year.
After a lot of brainstorming Brent and I came up with a great idea for the space. We decided to turn it into a reading nook! I love reading so I was super pumped about a cozy little spot to curl up and read. It also provides extra seating that we were lacking in the living room.
We wanted to try and make a pallet wall somewhere and thought since this wall is fairly small it would be the perfect place to try it. It also adds a focal point to the large area.
We had some pallets left over from our sodding adventure in the spring but quickly learned pallets are gross. They have bugs, are dirty and fall apart easily. We didn’t really want to deal with having to clean them up.
Brent suggested we use the same wood that pallets are made of but to cut, rough up and stain the wood ourselves so we could control exactly how they looked and we wouldn’t have to worry about sticking bugs to our wall. So we headed out to buy various sizes of wood to start our wood wall project.

Empty Alcove Turned Reading Nook Makeover
SUPPLIES
-
Reading Nook Decor
- Allen + Roth Bristow 36-in W 3-Light Mission Bronze Light
- Foam for Custom Sized Cushion
- Brown Fabric for Custom Sized Cushion
-
Reading Nook Bench Supplies
- Reading Nook Bench Plans
- (6) 2″x4″x96″ Pine Board
- (4) 1″x3″x96″ Pine Furring Strip
- (1) 1/4″x4’x8′ Plywood
- (2) 1″x4″x96″ Select Pine
- 3″ Deck Screws
- 2-1/2″ Pocket Hole Screws
- 2″ Wood Screws
- 1″ Finishing Nails
- 2″ Finishing Nails
- Wood Glue
- Wood Filler
-
Wood Plank Wall Supplies
- Creating Weathered Wood Tutorial Video
- Spruce-Pine-Fir Furring Strips (various widths)
- Rust-Oleum Wood Stain, Kona
- Hammer
- Nails
- Bar Clamps
- Drill
- Wire Brush Drill Attachment
- Table Saw
FYI: This post contains a few affiliate links to products we used to make this project. Gray House Studio does receive commissions for sales from these links but at no extra cost to you. We appreciate you supporting this site. Read our privacy and disclosure policy. You can also easily shop our recommended products here.
STEPS
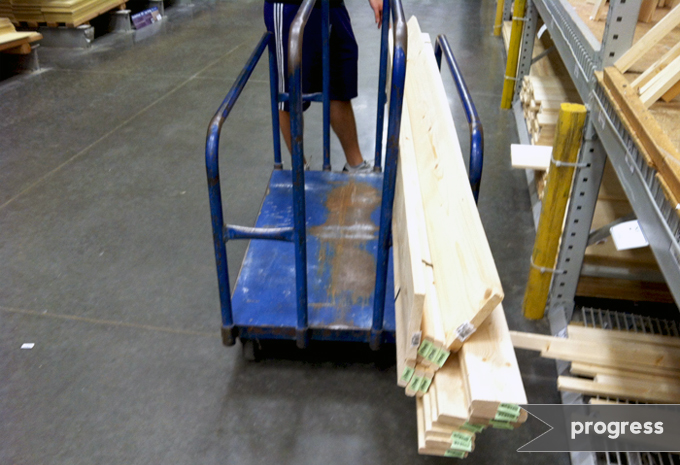
1. First, we purchased all the wood we needed to create the weathered wood wall.
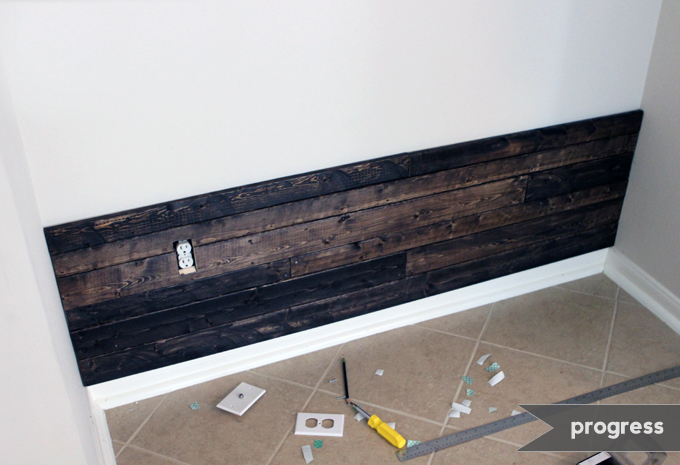
2. It took us two days but we got in a good rhythm of working on the wood wall. Brent would cut the wood, then I would hammer nails into it to make it look used and then he would rough it up and I would stain it.
We created a pattern varying the size of the boards and the color of the boards to make it look like organized randomness. It was fun but time consuming. The hardest part was definitely the top of the arch and cutting the boards to fit the shape.
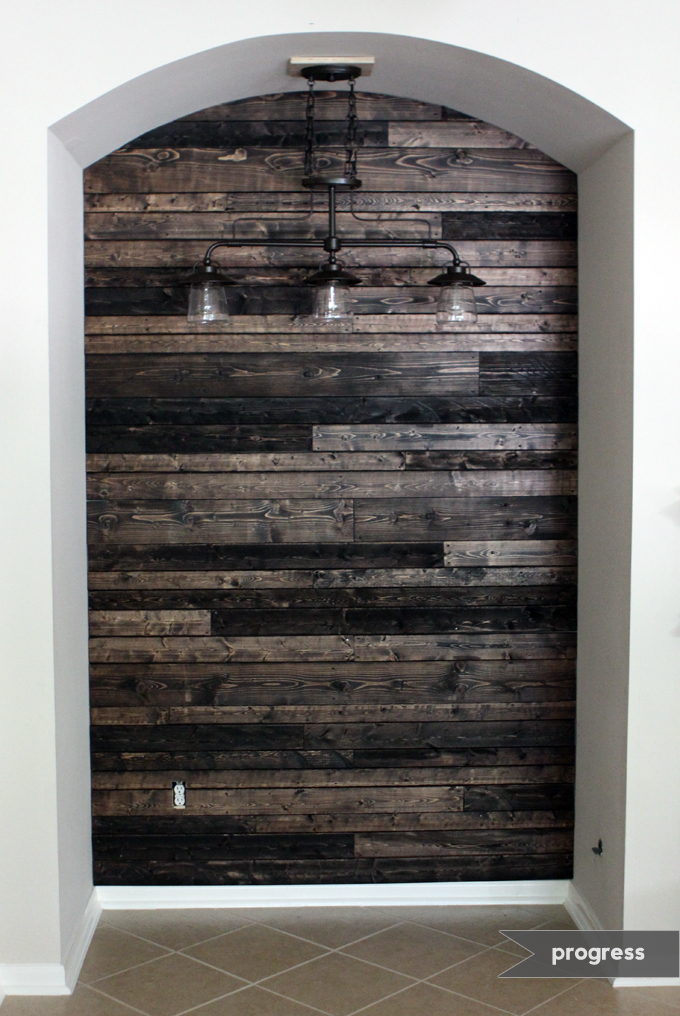
3. After the wall was finished, we hung this 3-Light Mission Bronze Light since the space did not originally have lighting in that area.
Brent had to drill a hole to add the light switch, climb in the attic and connect the wires and all that other electrician type stuff installing a brand new light source includes.
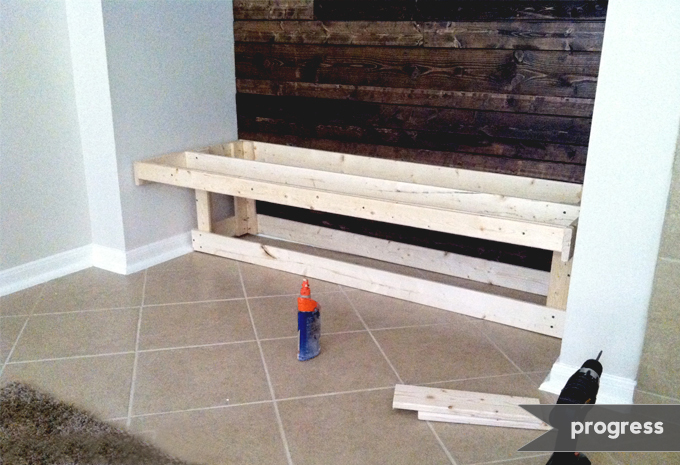
4. The next step was to start building the custom bench. I’ll admit, I had nothing to do with this part. I just sat on the couch while Brent built it and said, “looks good!” Brent built it so the top opens up to a secret compartment in the back that is hidden behind the bookshelf.

5. Next, it was time to make it comfy and cozy! We had a hard time finding a cushion to fit the exact size of the bench since it was custom made to be the exact size of the inset.
So we went and bought brown fabric to match our furniture and foam (we learned from that trip that foam is expensive) and made a custom cushion.
Our last purchase was to buy the pillows. We got a variety of sizes in the same color family to keep it simple and cohesive. Finally, we added a few books and decorations to the shelf to complete the look of the reading nook.
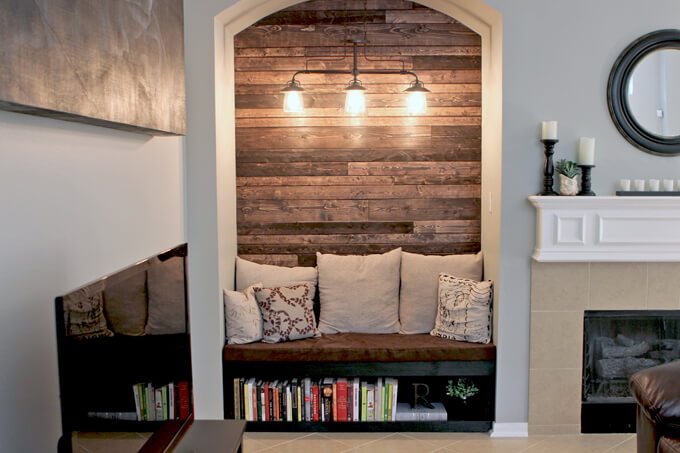
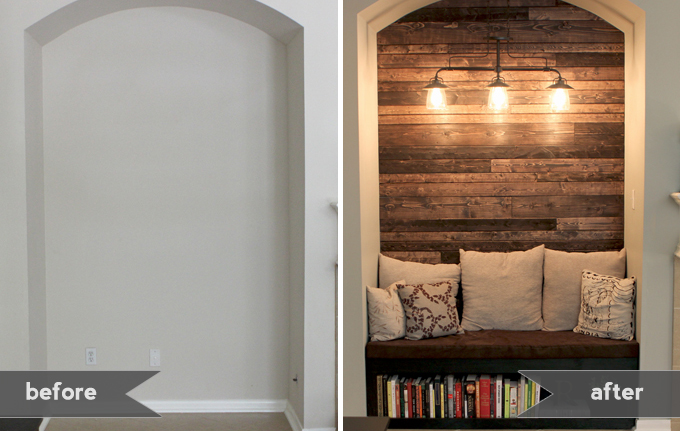
So what do you think? Big improvement to the space? We both love it. I can’t wait to spend many of winter nights curled up with a cup of coffee reading in my little reading nook.
We still have a ways to go in the living room to get it to where we want it. I am hoping to tackle that fireplace soon. Tan tile and white mantel, yikes! But we think this helps get the room a step in the right direction.
You can download our free plans for our reading nook bench with a bookshelf if you are interested in building your own and check out our video tutorial for creating wood with a weathered look like we did for our nook wall.
PIN FOR LATER

I love your reading nook and we’re in the process of making one ourselves using your model! Quick question though — I know you said you used RustOleum stain in kona for the wall, but what kind of stain did you use for the wood bench? It looks like a black/gray, which is exactly what we’re going for. Thanks!
I was wondering if you could put tongue and groove real wood on the wall like you did instead of pine?
Thanks. We found this very useful. We had the exact same issue and now we have our own reading nook.
Hi Zak- We’re glad you found our reading nook post helpful! It seems like those awkward alcoves are in quite a few homes these days. We would love to see a picture of your reading nook. Feel free to e-mail a picture to hello@studiograyhouse.com or tag us on social media @grayhousestudio. We would love to share your work. Thanks!
Finally! I found the real photo of my plans! 🙂 Thank you so much! Your nook looks amazing! The wood, the light. Perfect! I was looking for a nook like yours to show my hubby what I had in mind. Although, my nook is smaller than yours but I reject the bookcase option as it’s too predictable. Thank you also for the tutorials how to build it. I am so anxious to start building my own nook 🙂
Hi Meggie – Thanks so much! We’re glad you found our blog and stopped by to check out our reading nook project. We would love to see a photo of how yours turns out. 🙂
What brand and color of stain did you use?
The stain is Rust-Oleum Ultimate Wood Stain in Kona (affiliate link) It is by far the best stain we have found.
Great project!! I have the exact same space to fill, arched and everything but it is in the entryway. I had a question… found a beautiful bench to fit the space lengthwise, depthwise, it comes out about 10inches into the hallway. Is that a design no no? It’s expensive piece of furniture, so I want to make sure I’m not making a major design blunder here!
We wouldn’t recommend incorporating a bench that sticks out into the hallway. It is hard to say without seeing it but it might turn into a toe stumper in the middle of the night.
Oh so beautiful! I am sharing this on Pinterest.
Looks beautiful, can you please tell me where can i order this?
The wood plank wall is not available to order but you can pickup all the supplies to DIY the project at your local hardware store.
We’ve got a lot of reclaimed wood for our home we are building in McCall, ID. I’m going to use this idea downstairs next to my desk and yoga studio. Where did you find the pillows?
Hi Theresa! We purchased the pillows at At Home. They have a huge selection of pillows and they are very reasonably priced.
Where did you get the hanging light?
Hi Sara – we purchased it from Lowe’s.
Looks great! I love all the character it adds to the space. I am sharing this on Pinterest.
I did this in my front bathroom behind my sink. I ,however, got my wood from a wood flooring installer. You can go and ask for extra pieces or go thru the trash bin. I liked this wood because I got a lot of wood that did not match in size or color. After staining it the wall was beautiful.
Hi Laura, that’s a good and resourceful idea to get the wood from a flooring installer’s trash bin.
-Courtney
This is beautiful. I want the same wall in my nook. I see in the other post you used kona stain. What are the sizes boards you used? looks like 1×3, 1×4 and 1×6’s.
also did the wood have beveled edges or were they straight?
Hi Emily! Those are the correct sizes. The two smaller boards are labeled as “Pine Furring Strips” and have rounded/beveled edges. The 1×6’s are kiln dried pine boards with straight/square edges. We love how these boards look together and the different edges of the board provide some added interest. -Brent
Love this… Im currently in the process of building our new home & I would love to add a cove like this for my kids to enjoy. Can you share the dimensions of the actual cove?
Hi Corinda! Thank you! Our alcove is 62 inches wide by 26 1/2 inches deep and 104 inches tall at the center of the arch.
-Courtney
love what you’ve done with this space!!! Mind sharing where that gorgeous light fixture is from
Hi Lizett, thank you! We bought it at Lowe’s. It is the allen + roth brand.
-Courtney
Thanks so much for the share! It’s a great idea and one that I intend to mirror in the condo my fiancée and I are purchasing. Any chance that Brent will post the plans for the bench? That’s the only thing I’m not so clear on. Thanks!
Thanks and congratulations on the new condo! I am working on the plans and will be posting them this week. -Brent
Hi Josh! Just wanted to let you know that the bench plans are posted! You can find more information here: https://grayhousestudio.com/plans-for-reading-nook-bench/
Thanks for your interest!
-Courtney
Love what you did A LOT!! Quick tip about foam: *never* buy it from the fabric store. They will charge you 4 times more than if you buy it from a store like Fred Meyer. 3-inch dense foam sheets are sold with the camping equipment. You can get a bed-roll size for 20 bucks.
Thanks Kristen! We appreciate the tip about the foam. We are foam newbies so we will definitely take your advice for our next project. 🙂 -Courtney
Hi , that’s a great project! Couldn’t find the plans for it on your blog site. How might I get the plans for it?
Hi Robin Thank you!! The bench plans are now on the blog! You can find more information here: https://grayhousestudio.com/plans-for-reading-nook-bench/
Thanks for your interest!
-Courtney
I’m looking to do exactly this with an alcove and totally admire the transformation you’ve achieved! My problem is a huge floor to ceiling mirror on the back wall of the alcove, which we can’t remove, so I’d appreciate any suggestions you have for including (or hiding) such a beast as part of the nook? 🙂
Hi Kat, Thanks for the kind words and letting us know about your interest in the project. We are a big fans of heavy duty mounting tape. If you can’t take down the mirror to the nail the boards into the studs, mounting tape should hold the boards sturdy to the glass. Potential issues we can imagine is that the mirror could pull loose if it is not well attached to the wall or the boards might be difficult to remove from the mirror once attached. Good luck!
-Courtney and Brent
Hi! Can you tell me how thick the wood planks are that you used on your wall and what did you use to attach them? I have a wall I want to do this too but it is just drywall attached to studs. These look too heavy to just nail them into dry wall. Thanks so much!
Hi Debbie! We used pine furring strips that are all 3/4’s of an inch thick. All the boards we used were over 16 inches long so we were able to secure each board into at least one wall stud. We also used foam mounting tape to hold the boards in place, once level, while we hammered the nails in. If you are planning to use lots of small pieces of wood that might not fall over a wall stud you might consider lining the wall with plywood secured to the studs and covering the plywood with the wood planks. The plywood will provide a secure hold no matter where the nails fall.
Hope this helps,
Brent
This is beautiful!! We have to exact same alcove and it’s awful right now… Going to steal this idea from you! Any way you could tell me how you did the arch part of cutting the wood?? That’s the most intimidating to us…
The arch stumped us at first. The solution that worked for us was to trace the arch shape on paper and then transfer that shape to the top boards. Finally, we used a jigsaw to cut the top boards to match the arch curve.
-Brent
Hi! As all the comments above LOVE this idea! Is there a name for the type of wood that the pallets are made from? And it looks like you got different sizes or did you just cut them different sizes yourself?
Hi Jennifer! Thanks so much! We used pine furring strips. We bought the pieces in varying widths and then cut them to different lengths to fit our space. -Courtney
How many cost you’ve spent the wood supply and other parts? Average $$ ?
Beautiful.. Amazing
If I remember correct it was about $100 for the wood, $100 for the light fixture and $100 for the pad/pillows.
Yes foam is expensive. I will be using an unused futon mattress that I just figured I would use sometime. now is the time.
An unused futon mattress is a great idea! We are all for reusing things things that are already around the house.
This is an amazing reveal! Great Job!
Thank you Caroline!
Oh my! That clunk you just heard was my jaw hitting the floor and my ears steaming with jealousy! 😉 What a wonderful use of the space!!!!
Ha. You are too kind! Thank you!!
Looks Great! How did you attach the board to the wall (Nails, screws, glue, etc.) ? I have a similar space in my house and thinking of doing the same.
This is beautiful! You two are very creative! Any chance he will put up the plans of the bench? I would love one with a hidden back side!
Thanks Katie! Sure! We can definitely post the plans sometime soon.
Hi Katie! We FINALLY have the plans for the reading nook bench on the blog. Yay! You can find more information about them here: https://grayhousestudio.com/plans-for-reading-nook-bench/
-Courtney
Can you please post the color of the stain on the wood planks?
Sure. We used Rust-Oleum Ultimate Wood Stain in Kona
Love, love, love this! Looks beautiful,
Thanks so much Pat!
Saw the post on House Beatiful…totally guessed that you had to be in TX…because we have the same nook in our home! Our daughters would love that for reading! Just yesterday I slid a piece of furniture into it and thought…there has to be something better to do with this space…thank you!
You two are such a cute couple…love the ideas you hav posted!
Bye from North Texas!!
Thanks so much for the kind words! We know the feeling, we slid a lot of different pieces of furniture in that spot until we finally settled on building our own. I guess these TV nooks are a popular Texas thing. 😉
I absolutely LOVE how that turned out. I have a wall in my entry that would look great with similar planks & bench. Thank you for the inspiration!!
Thanks so much Gina!
Love it all, including the light fixture. Where did you find it?
Thank You! We got the light fixture at Lowe’s. It is allen + roth brand.
wonderful! What creativity!! And so much better!
I TOO have one of these empty nooks! I’ve wondered what to do with it. This idea would be great because it runs with the theme of rest of the living area. Great job! And, thanks for sharing it!
Thanks so much! We were stumped for quite awhile on what to do with the space too. Aren’t empty nooks weird?
What type of wood did you use for the project? How did hubby roughen up the wood? Would love to hear!
The boards are pine furring strips. We purchased them from Lowes and have a tutorial on how we roughed them up here: https://grayhousestudio.com/create-weathered-wood/
I came across your blog from Apartment Therapy’s feature of this reading nook – brilliant! I love what you’re doing (especially the design of the Our Home tab!) and will stay posted.
Thanks! We’re glad to have you following along! 🙂
I just read about your reading nook on Apartment Therapy. I think you should be proud, nice work !
Love small spaces and this one’s a winner! Brilliant ideas–especially the weathered look you created for the nook wall.
saw this beautiful project on Apartment Therapy–thank you! and great blog
Es realmente hermoso, me encantó