Organization

DIY Tiered Stand

DIY Tiered Stand

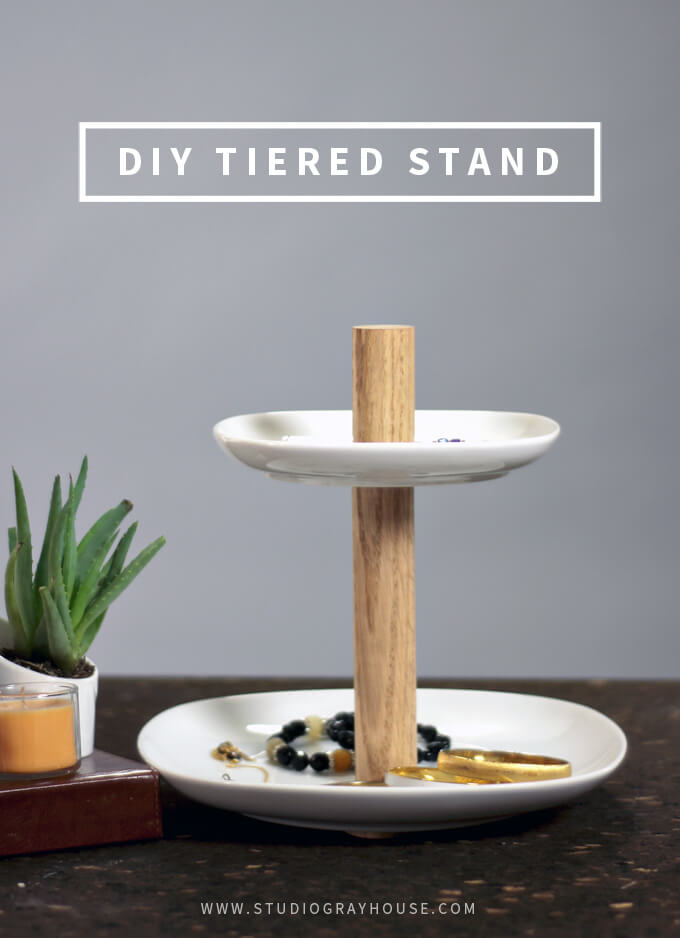
Make a DIY tiered stand from from two IKEA plates and a dowel rod to store jewelry or cupcakes.

DIY Tiered Stand

I am excited to share our latest DIY storage project, a DIY tiered stand. One of my favorite things to do is online window shop, find things I like and then Brent and I will come up with a way to make our own version (usually for quite a bit cheaper). Sure, we could just buy it. But where is the fun in that? We have had a lot of fun recently using a glass and tile drill bit and have been looking for ways to repurpose ceramic pieces just so we can put it to good use. Lately, it seems as though tools have been inspiring our projects.

One late night online shopping trip last week, I spotted a tiered stand that I really liked from Urban Outfitters. I knew instantly that it looked like the perfect project to use our glass and tile drill bit and drill through some plates! We are calling this an IKEA hack because we transformed two VÄRDERA plates into a tiered stand.

This DIY project turned out amazing, was so easy to make and required very few supplies. That’s the dream, right? So today we are going to show you how to make this DIY tiered stand to store jewelry, cupcakes, makeup or whatever you fancy.

VIDEO TUTORIAL

In this video below we will walk you through how to make and assemble a tiered stand from two ceramic plates and a dowel rod to store jewelry or cupcakes.

To see new DIY videos on Thursdays, be sure to subscribe to our channel ⇾
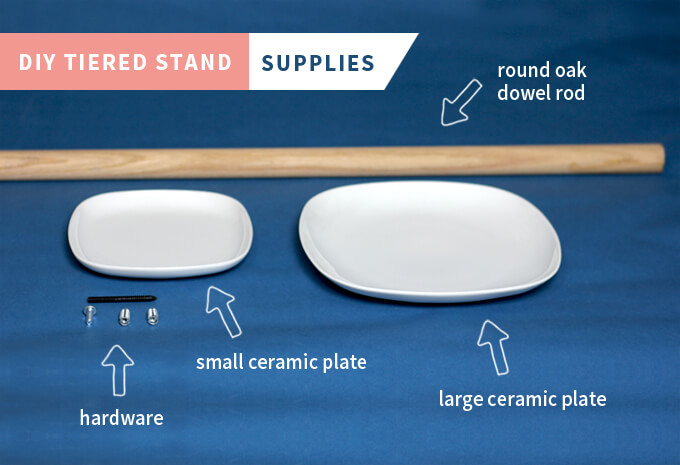
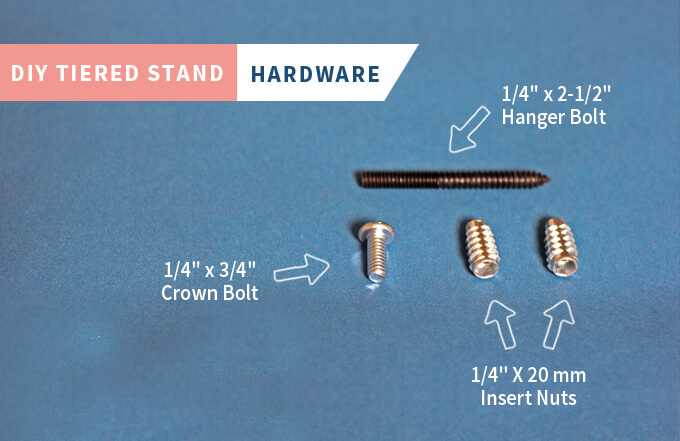

SUPPLIES

MATERIALS

TOOLS

  • Drill and/or Drill Press
  • Ruler & Pencil
  • Cup of Water
  • #6 Hex Bit
  • Miter Saw
  • 1/4″ Glass and Tile Drill Bit
  • 3/8″ Drill Bit
  • Centering Punch & Hammer

DIY Tiered Stand
DIY Tiered Stand

How to Make a DIY Tiered Stand

DIY Tiered Stand
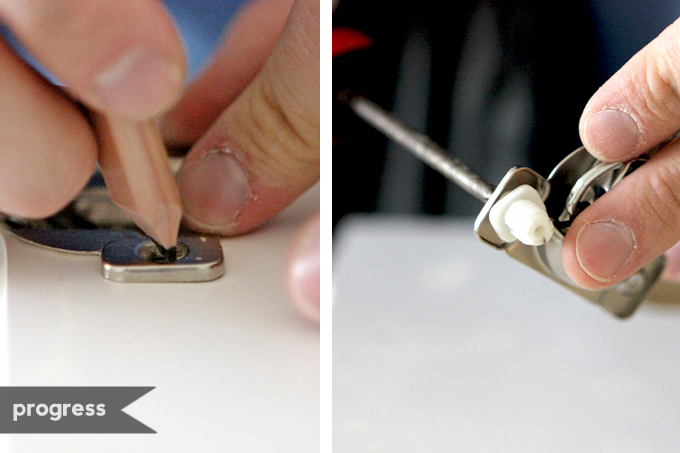
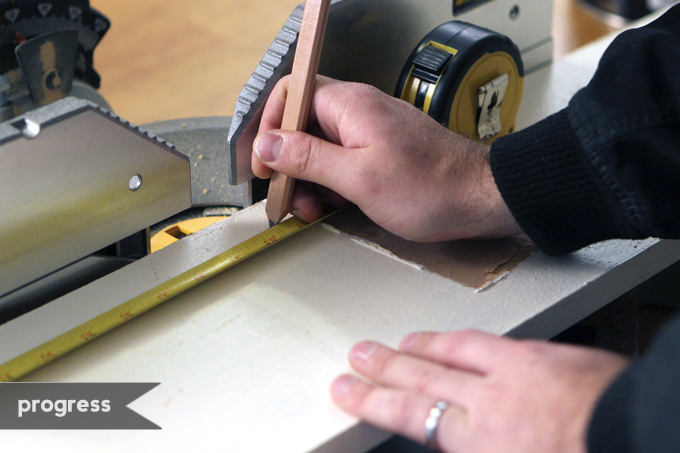
1. We recommend putting a few pieces of scrap wood under the small plate before you begin to avoid drilling into the work surface once the bit goes through the plate. Then, using a ruler, measure and mark the center of the plate.

DIY Tiered Stand
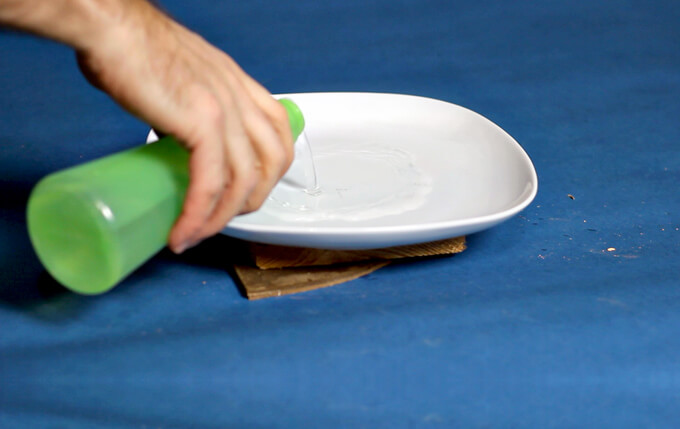
2. Next, take a cup of water and pour a generous amount onto the surface of the plate. The water will help cool the drill bit.

DIY Tiered Stand
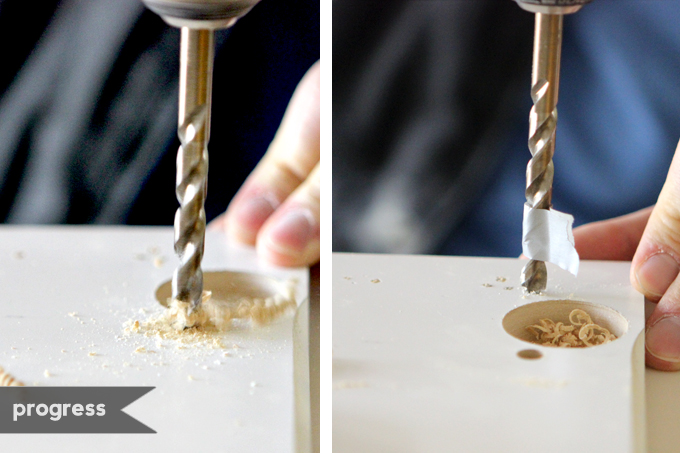
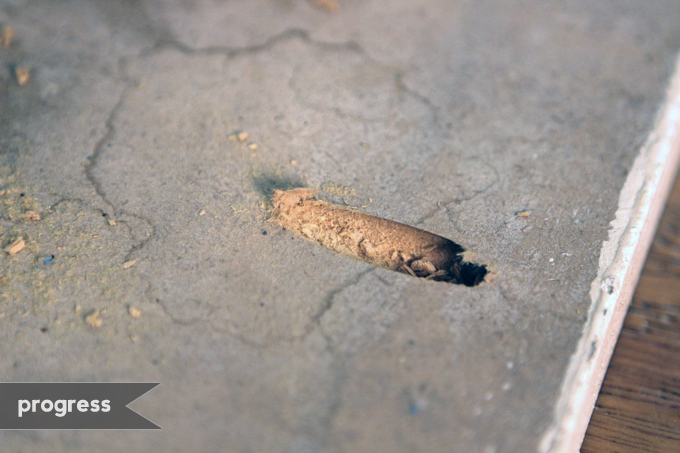
3. Now, using a 1/4″ glass and tile drill bit and a drill, line up the drill bit with the mark you made in step 1 and drill a hole through the plate.

DIY Tiered Stand
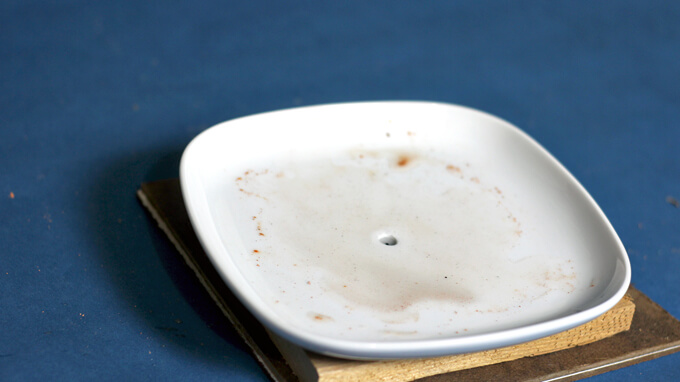
Once you have a hole in the small plate, wipe off the excess water and dirt and then repeat steps 1-3 for the larger plate.

DIY Tiered Stand
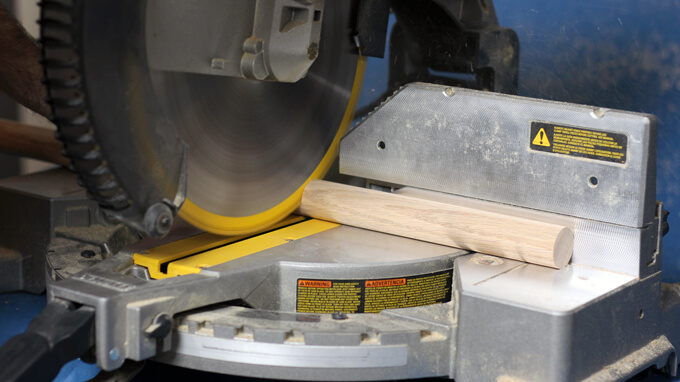
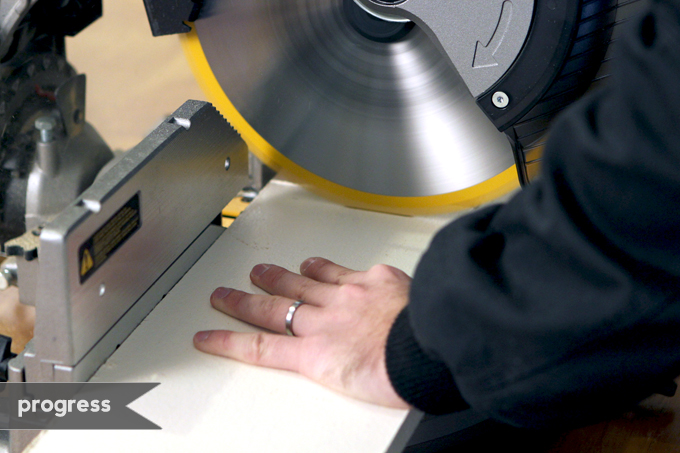
4. Using a miter saw, cut the dowel rod into two pieces. The small top piece will be 2 1/2 inches and the larger middle piece will be 6 inches.

DIY Tiered Stand
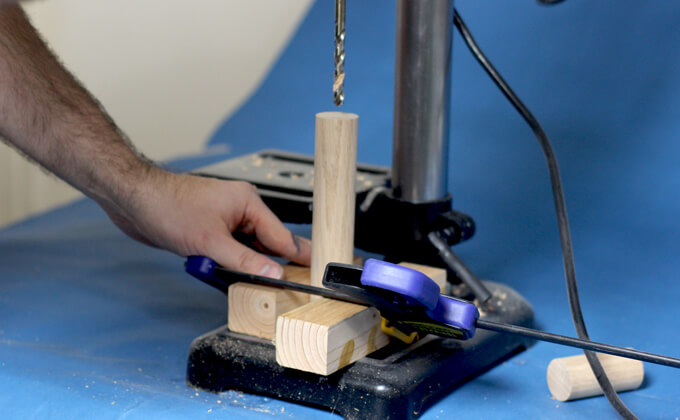
5. To hold the dowel rod vertical and make it easier to drill into it, clamp it between two scrap boards. We used 2x2s.

DIY Tiered Stand
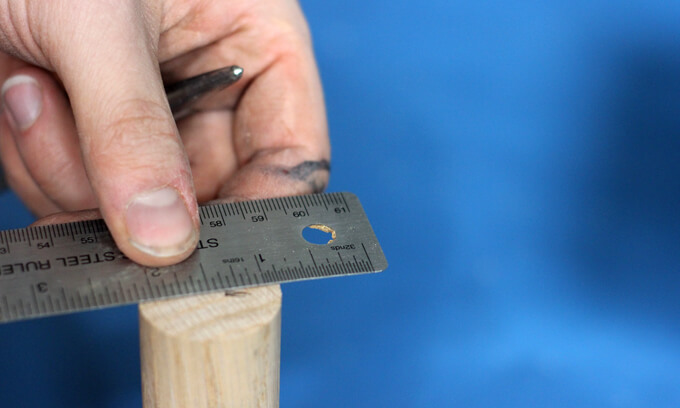
6. Using a ruler, mark the center of the end of the dowel rod. Do this step for both sides of the longer dowel rod and one side of the short dowel rod.

DIY Tiered Stand
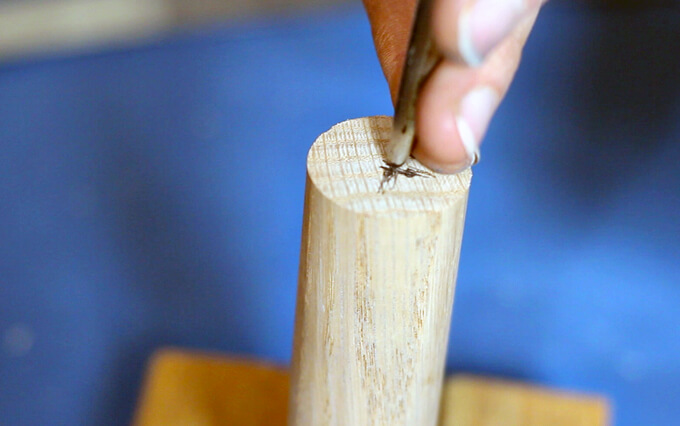
7. Now with a centering punch and a hammer, create a divot in the end of the dowel rod for the drill bit. You will need to do this step for both sides of the longer piece and one side of the short piece as well.

DIY Tiered Stand
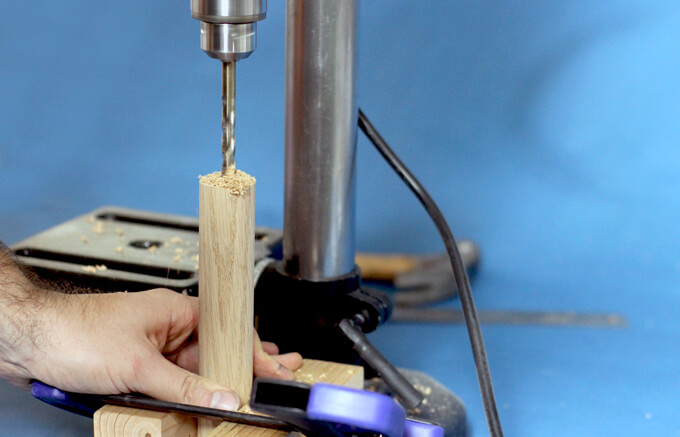
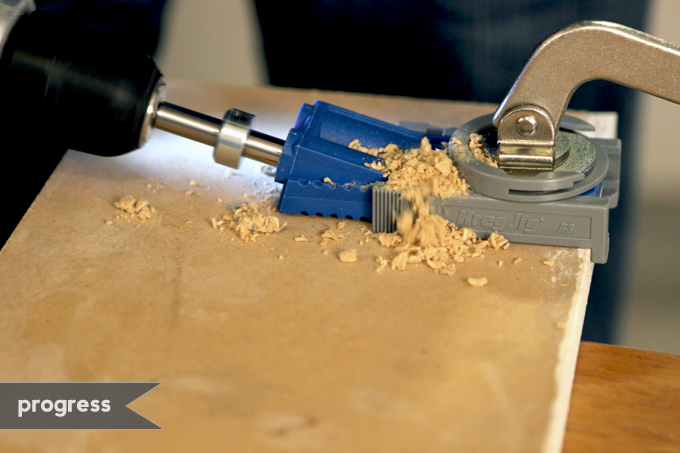
8. Using a 3/8″ drill bit, drill a hole 1″ deep in both sides of the longer dowel rod and one side of the short dowel rod.

DIY Tiered Stand
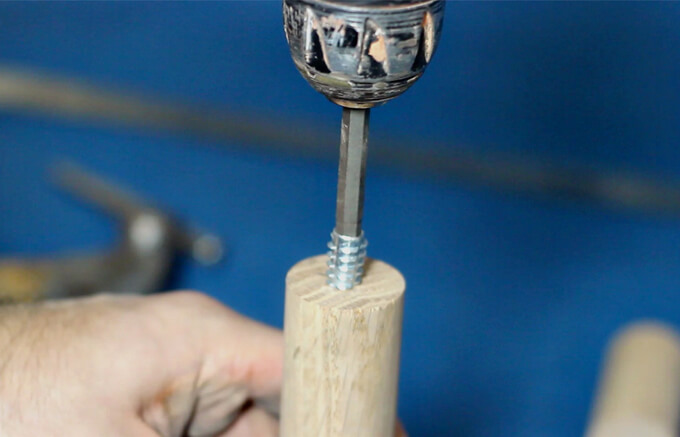
9. Take a #6 hex bit and screw the insert nuts into both sides of the long dowel rod.

DIY Tiered Stand
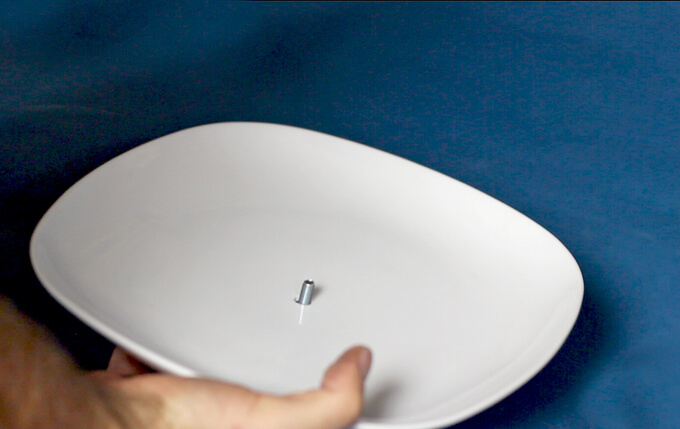
10. To assemble the DIY tiered stand, take the crown bolt and feed it through the hole in the large plate.

DIY Tiered Stand
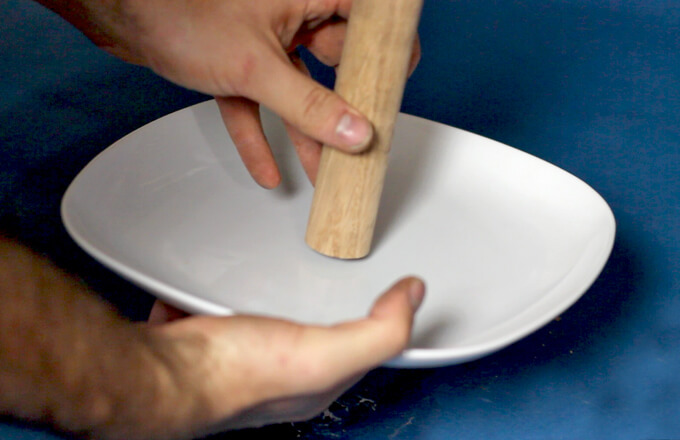
11. Now thread the crown bolt into the large dowel rod until it is nice and tight.

DIY Tiered Stand
12. Now screw the hanger bolt into the insert nut that is in the top of the large dowel rod.

DIY Tiered Stand
13. Run the hanger bolt through the hole in the small plate letting it sit on the large dowel rod.

DIY Tiered Stand
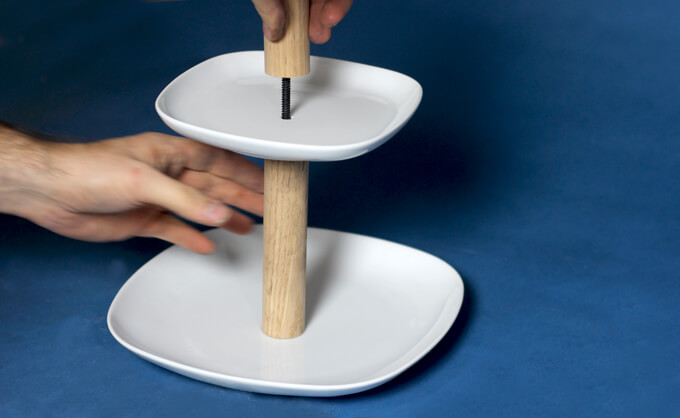
14. Finally thread the shorter dowel rod into the hanger bolt until it is flush with the plate.

DIY Tiered Stand
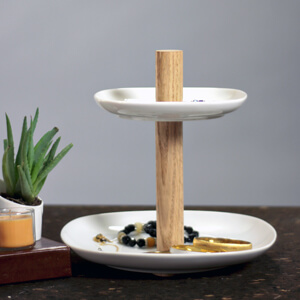
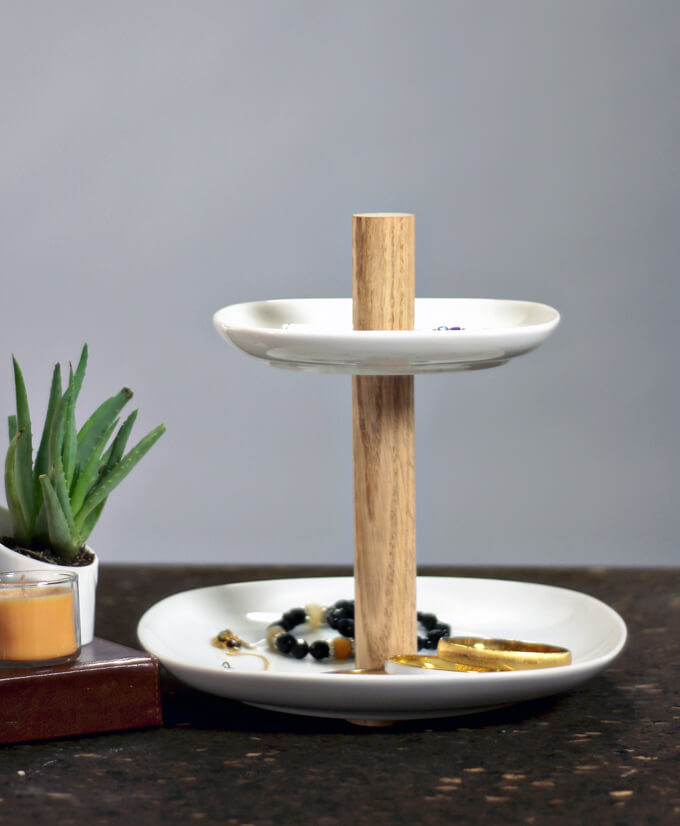
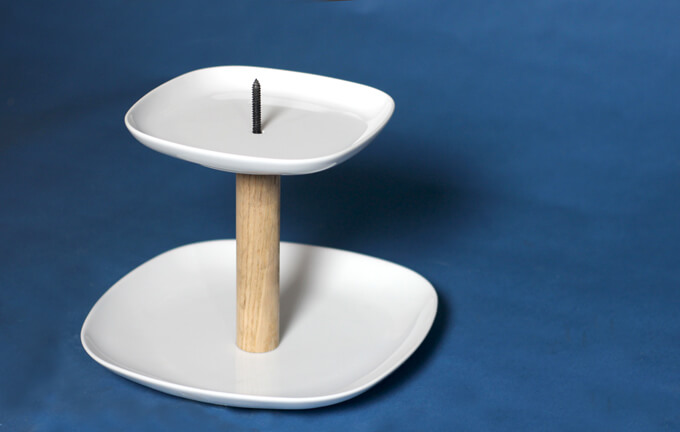
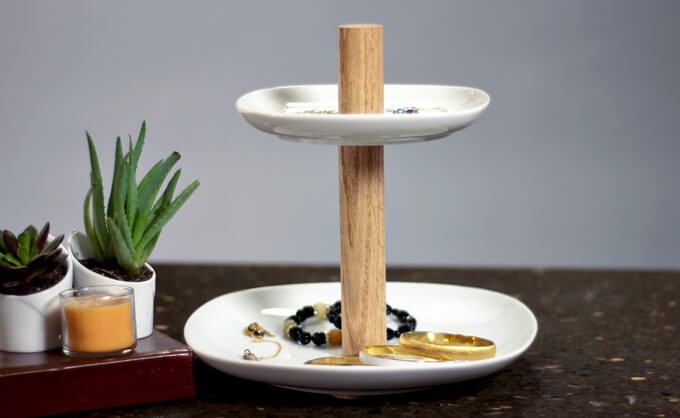
Your completed tiered stand should look like this once it is assembled.

DIY Tiered Stand
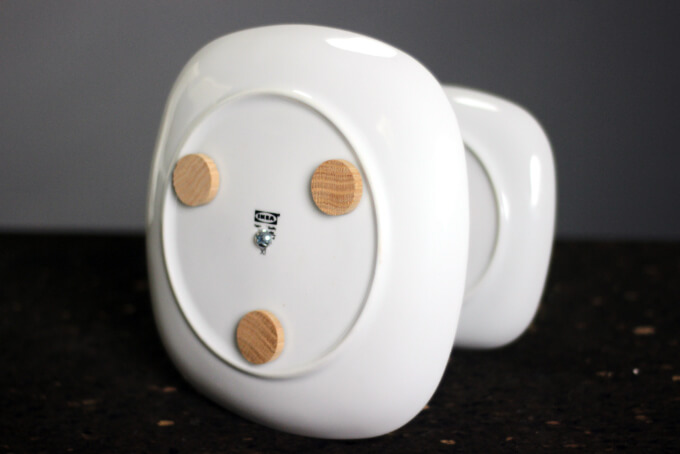
If you use a plate that doesn’t quite sit flat, you can add little wooden feet to the bottom like we did to make it balanced.

DIY Tiered Stand
I think Brent is pretty much a genius for figuring our how to make it screw together in two pieces with small holes in the plates. I pitched this idea to him and picked out the plates from IKEA and he worked up the game plan for making it happen. My mind was blown with his awesome solution.

I love, love how this repurposing ceramic dishes project / IKEA hack turned out. It looks exactly like the tiered stand I had my eye on at the store. The great thing about this DIY tiered stand is it is a very versatile storage piece. You can store jewelry in the bedroom or cupcakes in the kitchen or make two, one for each room!

We made ours modern and neutral to match the one I saw in the store because it fits with the style of our home but depending on the plates you choose and the color you paint/stain the dowel rods you make it look however you like.

PROJECT FEATURED ON GREAT DAY HOUSTON

Our DIY tiered stand was one of the repurposing ceramic projects we shared on the local live morning show, Great Day Houston. In case you missed it (or don’t live in Houston) you can watch our DIY segment here.

Brent and Courtney Richardson of Gray House Studio on Great day Houston

PIN THIS PROJECT

DIY Tiered Stand

Linen Closet Organization

Linen Closet Organization

Linen Closet Organization

This week we took advantage of the extra hour to work on some linen closet organization. There is just something about a freshly organized closet that makes me super happy. Ah, it is the little things like purging old junk and storing supplies in matching boxes to make it a good week.

When we started working on our home gym we pulled all the craft supplies out of the closet in that room and have been “storing” it on the guest room floor for the past three months. It has been difficult to find supplies for our projects. I was anxious to create a system so the next time Brent asks me where our double sided tape is I can give him a definite answer rather than “somewhere on the guest room floor”. Life is glamorous sometimes over here at Gray House Studio.

We have been planning on building a craft cabinet but other projects have come along and bumped it further down our to-do list so we started looking for a quick solution to get all the stuff off the floor (so our guests don’t have to walk through a maze of paints and pencils to get to their bed) and decided that our hall linen closet would be the perfect place to store all of our craft supplies.

Linen Closet Organization

Here is what our linen closet looked like this time last week. There were some sheets, some blankets, pillow cases, towels, etc. It resembled a linen closet but there just seemed like so much wasted storage space. It isn’t a huge closet but if organized properly, I was sure we could fit both linens and craft supplies in this space.

Linen Closet Organization

The first thing we did was pull everything out of the closet and create an even bigger mess in the guest room and the hall and the entry way. Doesn’t it seem like you have to create a mess to organize a mess? I like starting organization projects with a blank slate so I can get a good idea of how much space I am actually working with.

Linen Closet Organization

The one thing that holds me back from organizing is money. It is a dream of mine to have all our cabinets, drawers and closets neatly organized with matching baskets, bins and boxes but I can’t ever seem to pull the trigger on purchasing these items because you can’t just buy one or two you have to buy several and they can add up quick.

This closet was going to take a plethora of boxes because we needed to store a lot of small items like glue bottles, ribbon, tape, pencils, etc. We ended up using three different sizes of the TJENA boxes in black from IKEA.

Linen Closet Organization

The price was great ($3.99 for the large box that came with an option to add compartments, $1.99 for the smaller box, and $3.99 for a two pack of the magazine files).

They were paper boxes so I was skeptical about how sturdy they would be but we are very pleased with the quality. They are easy and quick to assemble. I used our label maker to create labels for each of the boxes to create a uniform look.

Linen Closet Organization

The large box comes with another piece that you can add to break up the inside into small compartments. It was perfect for storing all of our left over ribbon, yarn, twine, etc. I also used these large boxes to store paper and fabric scraps. I’m just over here in organization heaven.

Linen Closet Organization

We use our colored pencils the most for sketching project ideas. I wanted to create an easy way to grab them out of the closet but I didn’t want to spend any money.

I took one of my old candles from Bath & Body Works that just had a tiny amount of wax at the bottom and cleaned it out using a trick I found online which involves pouring boiling hot water into the jar so all the wax can come up to the top of the jar. I let it cool for a few hours so then I could just pop the wax and the wicks out. It works great and I like finding ways to recycle these jars.

After I cleaned it out really well, I spray painted it and stuck my favorite chalk tape onto it. It was a fast, easy and free storage solution.

Linen Closet Organization

Once all of our craft supplies were nicely organized in the top half of the closet, I started working on arranging the linens in the bottom half. We purchased two inexpensive wire baskets from HomeGoods. In these we are storing our extra sheets and pillowcases. Eventually I would love for all these to match. All white pillowcases and sheets for guests would be ideal and for the designer in me, look a lot nicer matching in the closet.

We store all the guest towels in the guest bathroom, all of our blankets in our living room ottoman and the extra blankets in the guest room closet. We just don’t have a ton of extra linens to fill up an entire closet in this stage of our life.

Linen Closet Organization

What a difference, no more wasted space! Does it mean that we are not grown ups yet if we have more craft supplies then linens in our newly organized linen closet?

It may seem like a strange choice, but Brent and I like making spaces work for us and to use them to create solutions to solve our storage problems or fit our interests and our recent linen closet organization project is the perfect example of just that.

DIY Yoga Mat Rack

Yoga Mat Rack

We designed and built a wall-mounted yoga mat rack out of wood to hang on the wall in our home gym.

DIY Yoga Mat Rack

We were back at work on a new DIY project for our home gym this weekend. We built a yoga mat rack to hang on the wall in our gym.

Now before you go thinking Brent and I are a pair of yoga masters, let me stop you right there and say we are not.

In fact it is safe to say we have a long way to go in the flexibility department. We use an iPad app and follow along with a virtual instructor so she is never too strict with us.

Now that I had my new yoga mat we needed a place to store our mats. We designed and built our yoga mat rack that we hung on the wall in our home gym.

Our yoga mat rack was designed to hold two yoga mats and our foam roller. It is a great solution if you want a place to store your mats that takes up little space and makes them readily available.

We’ve got the tutorial on how to make our yoga mat holder below.

2022 Personalized Christmas Ornaments
*** Thanks so much for supporting our small shop – Moon Rock Prints – this holiday season! ***

How To Build A Yoga Mat Rack

SUPPLIES

FYI: This post contains a few affiliate links to products we used to make this project. Gray House Studio does receive commissions for sales from these links but at no extra cost to you. We appreciate you supporting this site. Read our privacy and disclosure policy. You can also easily shop our recommended products here.

PROJECT PLANS

DIY Yoga Mat Rack Plans

Get our Yoga Mat Rack Plans

When you purchase our yoga mat rack plans you get a six page PDF with a detailed materials list, a cut list, exact dimensions for each piece, building instructions and the side panel template – all for only $7. We appreciate your support!

STEP BY STEP GUIDE

DIY Yoga Mat Rack

1. First we printed off the side panel template. After cutting the template out and taping it together we used the template to trace the two side panels.

DIY Yoga Mat Rack

2. We then used our jigsaw to cut out the shape we traced on the side panels.

DIY Yoga Mat Rack

After making all of our cuts on our pine panels, these are what our pieces looked liked.

DIY Yoga Mat Rack

3. Using our drill we pre-drilled four holes through the back panel into each side panel.

We attached the back panel to the side panel using 1-1/2″ screws. We made sure the screws were aligned with each rung of rack.

DIY Yoga Mat Rack

4. On the two inside shelves we used a square and a pencil to mark reference lines indicating where the shelf needed to be attached so it would be level.

We applied a thin bead of wood glue to the three sides of each shelf that would touch the side and back panels.

DIY Yoga Mat Rack

5. We used clamps to hold each shelf in place while the glue dried.

DIY Yoga Mat Rack

6. We secured each shelf in place by using a staple gun to drive four finishing nails through the side panel and into each shelf.

DIY Yoga Mat Rack

7. Finally, we stained it with our favorite Rust-Oleum Ultimate Wood Stain in Kona.

DIY Yoga Mat Rack

8. To secure the rack to the wall we used a stud finder to locate a stud, used a level to make sure it was straight and then drilled two screws (one at the top of the rack and one at the bottom) through the back panel into the stud.

DIY Yoga Mat Rack

Our completed rack is ready to hold some yoga mats! Like I mentioned earlier it could also be made to hold rolled up towels or to use as shelves to display smaller items.

DIY Yoga Mat Rack

By building and installing our yoga mat rack this weekend we are on our way to filling up the big empty wall in this room. The perk of being late in the game to pick out yoga mats is that I could match them to the rug in this room.

Even though the rack is meant for storage and organization purposes, we still wanted it to stand out as a good-looking decor piece for the room and I think Brent did a fantastic job making it happen.

PIN IT FOR LATER

How to Build A Yoga Mat Rack

Office Pegboard Wall Organization

Office Pegboard Organization

To create an office pegboard organization system, we painted and installed a pegboard on a wall in our office to add additional storage.

Office Pegboard Organization

When you are working out of your home, it is easy for personal mail to get lumped in with client invoices and before you know it you have a mountain of all different kinds of paperwork mixed together sitting on your desk.

I am the type of person who loves to be organized but can only stay organized if I have a designated place to put everything. If not, no matter how many times I straighten things up, the paper mountain returns or just moves to a different location.

I had been on the lookout for a solution to keeping all of the paperwork associated with my current projects organized as well as readily available to grab each morning when I sit down to work.

Office Pegboard Organization

I have tried several methods for organizing my current web design projects so I can easily keep all the associated mockups, invoices, client information, etc. in one location as well as visibly display the phase each project is in.

For awhile I had a dry erase board with my current schedule and kept all the in-progress client folders in a file rack. This situation was not ideal because visually the dry erase board did not fill up the wall and the top of the file cabinet felt cluttered.

Office Pegboard Organization

Office Pegboard Organization Wall

SUPPLIES

FYI: This post contains a few affiliate links to products we used to make this project. Gray House Studio does receive commissions for sales from these links but at no extra cost to you. We appreciate you supporting this site. Read our privacy and disclosure policy. You can also easily shop our recommended products here.

2022 Personalized Christmas Ornaments
*** Thanks so much for supporting our small shop – Moon Rock Prints – this holiday season! ***

STEP BY STEP GUIDE

1. First we sanded down our two pegboard pieces with 150 grit sandpaper.

2. Next, we painted the pegboards with SW Dovetail Paint.

3. Then it was time to hang the pegboards up. It was our visual preference to leave a little bit of space between the two boards.

We put small blocks of wood behind the areas where we planned on hanging clipboards and used a drill to drill into the wall through the wood so that the pegboard would appear as if it was floating off the wall and we could put metal pegboard hooks in it to hang the clipboards.

Office Pegboard Organization

4. Another part of this project was to spruce up some clipboards we had lying around.

We wrapped all the areas we did not want to paint with brown kraft paper.

A roll of non-adhesive kraft paper is cheap and comes in handy for a lot of our projects.

Office Pegboard Organization

Office Pegboard Organization

5. Finally, we spray painted just the front metal clip with teal spray paint to add a bit of color and to make the clipboards pop against the gray pegboard.

Office Pegboard Organization

Once the clipboards were dry, we hung them up on the metal hooks on our pegboard!

For each client I put all the associated paperwork in a folder and then attached it to a clipboard.

I ran several post-it notes through the printer with each phase of my design process.

The color represents the phase of the project and I can easily remove and stick a new note once the the project moves into the next phase.

Not only does the office pegboard organization make for a colorful display, I can easily see where each of my project stands and grab the one I need to work on that day off my project board.

I ordered them so the new projects are at the top and the ones with the closest launch date are on the bottom. Once a project is complete, I will file it away in my file cabinet below and a clipboard opens up for a new project to begin!

This DIY home office project was easy, quick to put together and actually only cost us one can of green spray paint since all the other supplies we used were left over from other projects.

I really like how visually the whole wall is filled up now and the space feels much more complete than it did before with this office pegboard organization solution.

I believe the office pegboard organization system will work really well for keeping all my projects organized. Now the paper mountain will be more of a paper hill while I move on to figuring out a good solution for sorting the mail more efficiently.

PIN IT FOR LATER

Office Pegboard Organization

Adding Shelves to Bathroom Cabinet

Adding Shelves in Bathroom Cabinets

Check how this quick home DIY tutorial for adding shelves in bathroom cabinets. This simple update creates more storage space to organize all your bathroom essentials.

Adding Shelves in Bathroom Cabinets

This morning Brent and I worked on a quick little organization project that really made me happy! Our project was adding shelves in the bathroom cabinets.

I don’t have a ton of beauty products but I do have the typical necessities and not a lot of places to store them. Don’t most bathroom cabinets seem to have so much wasted space at the top?

All of my stuff was just stacked on top of each other in one big pile on the bottom and if stuff got pushed to the back of the cabinet…well…it might as well have been lost forever as far as I was concerned.

I’ve tried to organize this area multiple times but I have found that without the proper set up, such as a designated space for each item, it doesn’t matter how many times you organize it, it quickly turns into a big messy pile again.

I am kind of embarrassed to be sharing this photo but for the sake of showing the drastic difference I feel like the shelves made, I’ll do it. Below is the disorganized mess it looked like before.

Adding Shelves in Bathroom Cabinets

Brent built me two shelves in my cabinet using stuff we already had in our garage. Score! He built me one on the bottom and one at the top.

We decided to take the faux drawer above the cabinet door and add hinges to it so it could open up to a shelf we would install behind it where I could store my hair dryer and curling iron.

We have seen a few photos of this floating around on the internet but wanted to attempt to figure out our own Gray House style of making it happen.

2022 Personalized Christmas Ornaments
*** Thanks so much for supporting our small shop – Moon Rock Prints – this holiday season! ***

Adding Shelves in Bathroom Cabinets

SUPPLIES

FYI: This post contains a few affiliate links to products we used to make this project. Gray House Studio does receive commissions for sales from these links but at no extra cost to you. We appreciate you supporting this site. Read our privacy and disclosure policy. You can also easily shop our recommended products here.

STEP BY STEP GUIDE

Adding Shelves in Bathroom Cabinets

1. First we popped off the faux drawer. It came off really easy.

Adding Shelves in Bathroom Cabinets

2. Then using pliers we removed the brackets and staples from the drawer face and the cabinet.

Adding Shelves in Bathroom Cabinets

3. The 5/8″ cabinet hinges we bought came with instructions saying that the center of the hole should be 2 centimeters from the edge of the board and the diameter of the hole should be 35 millimeters.

So Brent measured where he needed to drill and then used this forstner bit and drill to drill the holes for the hinges.

Adding Shelves in Bathroom Cabinets

Adding Shelves in Bathroom Cabinets

4. Brent marked a hole for the plastic screw anchor.

Adding Shelves in Bathroom Cabinets

5. Then he used a piece of tape to mark the depth of the cut so he would know when to stop drilling.

This would prevent the drill bit from going all the way through the drawer face.

Adding Shelves in Bathroom Cabinets

6. With a soft faced mallet, Brent hammered in the plastic screw anchors and then attached the hinge to the drawer face with the screws.

Adding Shelves in Bathroom Cabinets

7. After centering the drawer face on the cabinet, he attached the other side of the hinge to the cabinet frame to make it a functioning door.

Adding Shelves in Bathroom Cabinets

8. Then Brent started building the shallow shelf that would sit behind the hinged door.

He used a piece of scrap wood that came from a shelf we tore down in our garage. We found this white laminate shelf that you could use that is very similar.

Bonus: it was already painted white! That was a huge time saver. He measured the width the shelf needed to be to fit in the cabinet in front of the sink.

Adding Shelves in Bathroom Cabinets

9. Next, he cut the shelf to size using a miter saw.

Adding Shelves in Bathroom Cabinets

10. He flipped the shelf over and clamped a Pocket-Hole Kreg Jig to the board and then used it to drill a pocket-hole on the bottom of the board.

Adding Shelves in Bathroom Cabinets

A close up of what the pocket-hole looks like.

Adding Shelves in Bathroom Cabinets

11. Finally, he installed the top shelf behind the hinged door. He used the same steps above for the bottom shelf as well.

Adding Shelves in Bathroom Cabinets

I am now storing my hair dryer and curling iron behind this secret little door. I like having these items up higher and within reach so they don’t fall towards the back of the cabinet.

Adding Shelves in Bathroom Cabinets

After Brent installed the bottom shelf, I finally got to organize this area like I have always wanted! I was able to add another inexpensive baskets now that I had two shelves.

As you may be able to see, I found another use for my chalkboard tape!

I found these little glass containers left over from our wedding and added some chalkboard tape labels to them and am now using them to store all my hair ties and bobby pins that were laying all over the place.

Hopefully by adding shelves in bathroom cabinets and having a place to store these things will keep them from getting lost and me having to buy new ones all the time.

Adding Shelves in Bathroom Cabinets

It was a small project with a transformation that has a huge impact on that space. I am so happy with the results of adding shelves in bathroom cabinets and grateful Brent took the time to work on this with me. I love that each item has a designated spot to be put back and that all the space in the cabinet is now being utilized to it’s max capacity.

If you have any questions about adding shelves in bathroom cabinets, feel free to leave them in the comment section below.

PIN IT FOR LATER

A home DIY Tutorial by Gray House Studio showing how to add shelves to your bathroom cabinets. If you have a faux drawer, this tutorial shows how to add hinges to the faux drawer so you can access an additional shelf perfect for storing hair dryers and curling irons. Adding shelving to bathroom cabinets is a great way to add more storage space to keep your bathroom essentials organized.

Organize a Pantry with Chalk Tape

Organizing a Pantry with Chalkboard Tape

How we went about organizing our prantry with chalkboard tape

Organizing a Pantry with Chalkboard Tape

One of my Christmas presents from my parents this year was a roll of chalkboard tape and a chalk marker. I was so pumped. My parents know and understand my love of office supplies so well. I’m not sure if this stuff is fairly new or I have just been oblivious to it in the stores but I am going to guess it is the former because I’m usually pretty on top of the latest tape craze. I’m not ashamed to admit I have bought decorative duck tape before for no real reason other than it had Super Mario on it (I ended up giving it to my brother) and impulsively buy washi tape just about every time I got to Target. Because you know, you can never have too much of that stuff for projects.

I immediately started to look for a place I could use my chalkboard tape in our home. I think I was scaring Brent with some of my suggestions. Then it hit me. I could use it for labels on my OXO food storage container set that Brent got me for Valentine’s Day last year. I was only kind of utilizing them but had not really taken the time to actually migrate all our food from packages to storage containers because I was still trying to figure out how to label them. Chalkboard tape was my answer.

Organizing a Pantry with Chalkboard Tape

How I Organized our Pantry with Chalkboard Tape

Organizing a Pantry with Chalkboard Tape

SUPPLIES

plastic storage container
chalkboard tape
chalk marker

*This post contains an affiliate link. You can read our disclosure policy here.

To organize our pantry I used: food storage containers, a roll of chalkboard tape and a chalk marker, that’s it! Well, besides all the other storage stuff I swiped from my mom when she was purging her own pantry. Score! I realize this concept of using food storage containers with chalkboard labels in the pantry is nothing new or even remotely unique. What really made the difference for me is using the chalkboard tape. There are a lot of chalkboard labels out there but they were so small and too decorative in appearance. I had a hard time writing on them and fitting in everything I needed to write. Plus they didn’t cover much of the container and I could never get them to erase very well.

Organizing a Pantry with Chalkboard Tape

^^^ I loved that the chalkboard tape was already the perfect height. All I had to do was cut it to the width of the container. Plus, it offers a modern appearance and a realistic writing surface size. I also found that it wipes off really easy.

Organizing a Pantry with Chalkboard Tape

^^^ Let me just say using a chalk marker also makes the world of difference. Have you ever tried to write with chalk on a very tiny surface? It’s hard. There was almost no point in me even bothering writing with the chalk on those tiny chalkboard labels because half the time Brent couldn’t even read what I wrote anyway.

Organizing a Pantry with Chalkboard Tape

^^^ My mom gave me this idea, which I think is brilliant! Her suggestion was to use the chalk marker and write on the back of the storage container the date I bought the food and the date it expires. Which is a really good point because once you transfer the food to the storage container and throw away the package, you no longer have the reference. And I don’t know about you but I have enough to remember besides when I bought a package of rolls. I just made a little note on the back of the container with a B and the date I bought it and an E and the date it will expire. The chalk marker works really well for this because it writes on smoothly and wipes off really easily once you reload the container with new food. Note: I would like to mention that the photo above is from when I organized my pantry about a month ago. I promise we are not still eating rolls that are about a month past their expiration date.

We don’t have a lot of food in our pantry right now because there are just two of us and we usually only buy food for a week at a time. Plus, I am a little obsessive about throwing out expired food every week on trash day. So the whole organizing the pantry process only took a few hours one afternoon.

Both Brent and I agree it feels nice to have an organized pantry. Below is what it looks like now.

Organizing a Pantry with Chalkboard Tape

Organizing a Pantry with Chalkboard Tape

Organizing a Pantry with Chalkboard Tape